If you have a travel trailer, then you know that one of the most important parts of the trailer is the subfloor. The subfloor is what provides support for the floor and keeps it level. Over time, the subfloor can become damaged or worn down, which can cause problems with the flooring above it.
If you’re in need of a new subfloor, then follow these steps to replace it.
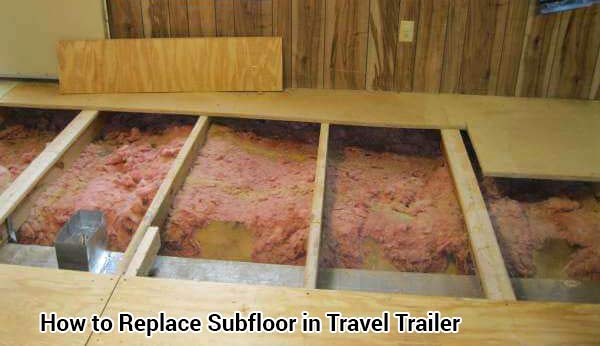
- Remove all the flooring and furniture from the travel trailer
- Cut out the damaged subfloor with a circular saw
- Measure and cut new plywood to fit in the space of the old subfloor
- Secure the new plywood to the joists with screws or nails
- Apply construction adhesive to the edges of the new plywood and secure it to the old subfloor with screws or nails
- Install new flooring and furniture in your travel trailer
How Do You Replace the Rotten Floor in a Travel Trailer?
When it comes to replacing the rotten floor in a travel trailer, there are a few things you need to take into account. First and foremost, you need to make sure that the rest of the structure is sound. If there is rot or water damage elsewhere in the trailer, it’s best to address those issues before moving on to the floor.
Once you’ve made sure that the rest of the trailer is sturdy, you can start working on removing the old flooring. This can be a difficult and time-consuming task, depending on how much damage has been done. You’ll need to use a pry bar and/or chisel to remove all of the old boards, taking care not to damage any of the remaining good wood.
Once all of the old boards have been removed, it’s time to start installing new ones. Begin by laying down a layer of plywood or OSB (oriented strand board) over the subfloor. Make sure that all joints are properly sealed with construction adhesive or screws before moving on to the next step.
After your new subfloor is installed, you can begin adding your new flooring material. For travel trailers, vinyl plank flooring is often used because it’s durable and easy to install. However, you can also use laminate or carpet if you prefer.
Start at one end of your trailer and work your way towards the other, cutting each piece of flooring as needed so that it fits snugly against its neighbors. Again, be sure to seal all joints with construction adhesive or screws so that your new floor will be able to withstand years of wear and tear.
How Do You Redo a Subfloor in a Camper?
If you’re looking to redo the subfloor in your camper, there are a few things you’ll need to take into consideration. First, you’ll need to determine what type of subfloor material you want to use. There are a variety of options available on the market, so it’s important to do your research and choose the option that best suits your needs.
Once you’ve decided on the right material, you’ll need to measure the area of your camper where the new subfloor will be installed. This will ensure that you have enough material to complete the job.
Next, you’ll need to remove the old subflooring.
This can be done by using a pry bar or sawzall to remove any nails or screws holding it in place. Once the old flooring is removed, you can begin installing the new subfloor. Start by attaching any plywood sheets or boards to the joists using screws or nails.
Then, apply adhesive to the back of each piece before laying it down onto the existing flooring. Be sure to line up all seams and joints before allowing the adhesive to dry completely.
After the adhesive has dried, you can then install any flooring material over top of the new subfloor (i.e., carpet, vinyl, etc.).
Start by measuring and cutting each piece of flooring so that it fits snugly against walls and other obstacles in your camper. Then, apply adhesive directly onto the subfloor before laying down each piece of flooring one at a time.
How Much Does It Cost to Replace Rv Subfloor?
The cost to replace RV subfloor will vary depending on the size and type of RV, as well as the materials used. For a small RV, the cost may be around $500, while for a large RV, the cost could be upwards of $2000. The most common material used for RV subflooring is plywood, which can range in price from $30 to $100 per sheet.
Other materials that may be used include OSB (oriented strand board) or composite boards.
What Can I Use for an Rv Subfloor?
There are a few different materials that can be used for an RV subfloor. The most common material is plywood, but you can also use OSB (oriented strand board) or particle board. Plywood is the best option if you can find it in the right thickness (usually 3/4″), but it can be more expensive than the other options.
OSB is cheaper than plywood and is available in thicker sizes, but it’s not as strong as plywood and isn’t always available in the right size. Particle board is the cheapest option, but it’s not as strong or durable as either plywood or OSB.
Ep. 7 DIY: Replacing subfloor in a camper. Life Goals
Rv Subfloor Material
Rv Subfloor Material: What You Need to Know
When it comes to RVing, one of the most important parts of your rig is the subfloor. This is what provides structural support for your RV and keeps everything together.
It’s important to choose the right material for your subfloor, as this will impact both its durability and its lifespan. In this blog post, we’ll take a look at some of the most popular materials used for RV subfloors and help you decide which one is right for you.
plywood: Plywood is by far the most common material used for RV subfloors.
It’s strong and durable, making it ideal for withstanding heavy use. However, plywood can be susceptible to water damage, so it’s important to make sure that any seams or joints are properly sealed before installing it in your RV.
OSB: OSB (oriented strand board) is another popular choice for RV subfloors.
It shares many of the same properties as plywood, but is slightly cheaper and easier to work with. One downside of OSB is that it can be more susceptible to moisture than plywood, so make sure you take proper precautions if you go with this option.
luan: Luan is a type of plywood that’s often used in RVs due to its light weight and flexibility.
It can be easy to work with and install, making it a good choice if you’re not experienced in working with wood products. However, luan isn’t as durable as other options on this list and may not hold up as well over time.
Rv Subfloor Replacement Cost
If you are in need of an RV subfloor replacement, the cost will depend on a few factors. The size of your RV, the type of subflooring material, and the amount of damage will all play a role in determining the final cost.
On average, you can expect to pay between $500 and $2000 for an RV subfloor replacement.
The size of your RV will be the biggest factor in determining the price. A larger RV will require more materials and labor, which will increase the overall cost.
The type of subflooring material you choose will also affect the price.
If you opt for a more expensive material like plywood, you can expect to pay more for your replacement. However, if you choose a less expensive option like particle board, you can save some money on the project.
Finally, the amount of damage to your existing subfloor will also play a role in determining the cost of replacement.
If there is extensive damage, it may be necessary to replace more than just the subfloor itself. This could end up increasing the total cost of the project.
Styrofoam Camper Flooring
Styrofoam is a great choice for camper flooring because it’s lightweight, durable, and easy to install. It’s also a good insulator, so it will help keep your camper warm in the winter and cool in the summer.
Replacing Camper Floor Forum
When it comes to replacing the floor in your camper, there are a few things you need to take into consideration. First, what type of flooring do you want? There are many different options out there, so you’ll need to decide what’s right for you and your family.
Second, how much money are you willing to spend? Flooring can be expensive, so you’ll need to set a budget before you start shopping. Finally, how much time and effort are you willing to put into the project?
Replacing a camper floor is no small task, so be sure you’re prepared for the work involved.
Once you’ve considered all of these factors, it’s time to start shopping for new flooring. There are many different places you can buy camper floors, so take your time and find the best deal.
Be sure to compare prices and features before making your final decision. And don’t forget to ask around for advice from other campers who have been through the process! With a little research and planning, you should be able to find the perfect replacement floor for your camper.
Conclusion
Replacing the subfloor in a travel trailer is not as difficult of a task as one might think. With a few tools and some basic knowledge, most anyone can do it. The first thing to do is remove all the old flooring material.
This can be done with a putty knife or a chisel and hammer. Once all the old material is removed, it’s time to clean up the area. Any nails or staples that are left behind should be removed so they don’t damage the new flooring material.
Now it’s time to install the new subflooring. plywood is typically used for this purpose, but other materials may be used as well. It’s important to make sure that the new subflooring is securely attached to the frame of the travel trailer so that it doesn’t come loose over time.
This can be done with screws or nails driven into the frame itself. Once the new subflooring is in place, you can then install your new flooring on top of it.
